
What are uramaki rolls?
Uramaki rolls, also known as inside-out rolls, have become a staple in sushi restaurants worldwide. They offer a twist on more traditional sushi with nori on the inside and the rice on the outside of the roll.
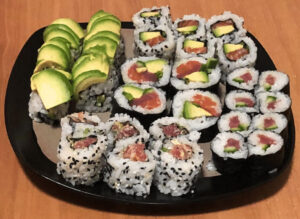
Popular versions include spicy tuna, California, Philadelphia, dragon, rainbow, caterpillar, and spider rolls.
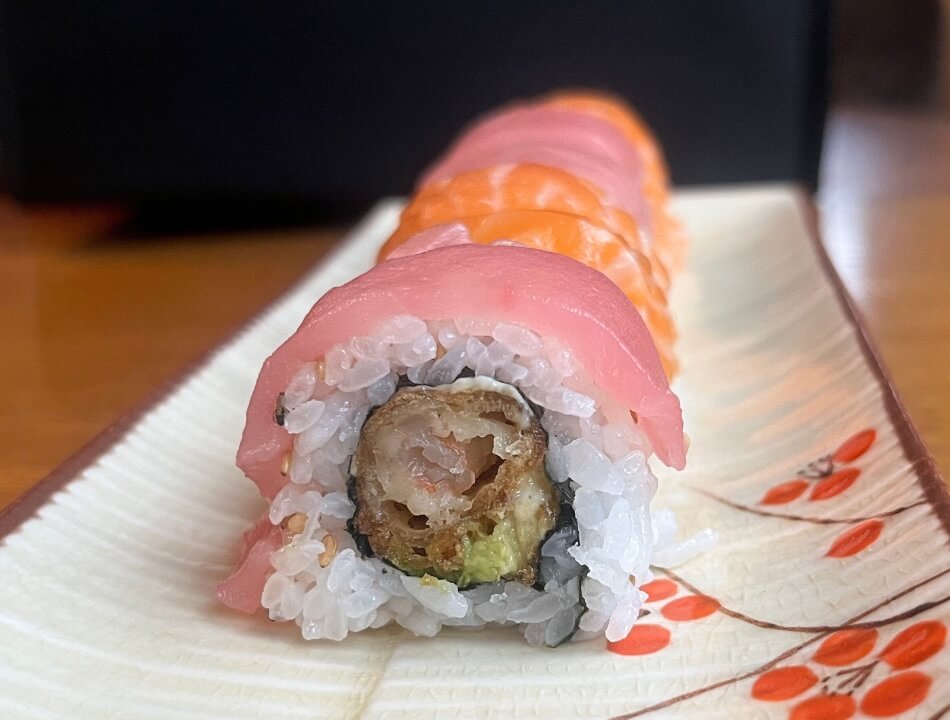
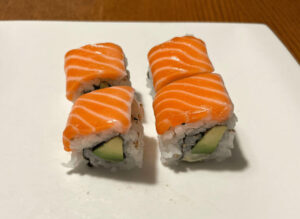
The inside-out design of uramaki rolls allows for endless possibilities. Experiment by filling your roll with different combinations and then get creative by decorating the outside. Wrap your roll with slices of fish, avocado or roll it in sesame seeds, tobiko (fish roe) or even tempura flakes to add a little extra texture. Not only will you have more interesting flavour combinations but the rolls will also look a lot more impressive with little extra effort.
Uramaki for beginners
Uramaki are very forgiving to roll and you can’t really mess them up, making them ideal for beginners. You don’t need to worry about adding too many ingredients and struggling to close your roll. You also don’t need to worry about ripping your nori or rolling it back on top of itself. The hardest part is probably cutting the rolls but just make sure your knife is really clean (wipe it between each slice if you need to) or you can cover the roll in plastic wrap which makes it much easier to cut. It’s such a waste of plastic though so try and cut without doing this if you can.
Extra add-ons
If you want to get even fancier then try flaming your toppings. Lion kings are one of my favourite uramaki rolls and are always such a hit with dinner guests. They have thin slices of salmon draped across the top of the roll with a little kewpie mayo and the secret ingredient of cheap shake parmesan cheese. Trust me … it sounds terrible but it’s actually amazing. The salmon, kewpie and parmesan are flamed with a kitchen torch, similar to how you would make an aburi.
How to make uramaki
You can read my full guide on sushi rice here with tips and techniques, and the recipe is also below.
Prepare your ingredients
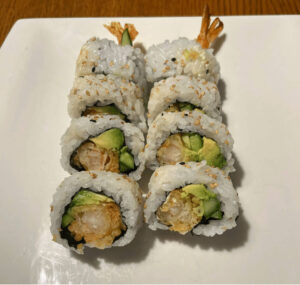
First gather all of your ingredients. Feel free to be as creative as you like. In this example I used tempura shrimp, cucumber, avocado, kewpie mayo and green onions.
Assembly
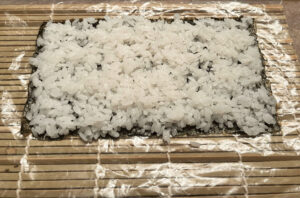
First you need to cover your rolling mat in plastic, or put it inside a giant ziplock bag. This is so the rice doesn’t stick to your mat. Take a full sheet of nori and place it on your rolling mat, shiny side facing down.
Start by spreading a thin layer of seasoned sushi rice onto the nori, covering the whole sheet. You don’t need to leave a gap of nori across the bottom without rice when making uramaki rolls. Fill the whole sheet! I sprinkled my rice with sesame seeds for extra flavour and to look nice. Sorry no photo of that one.
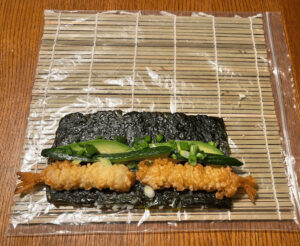
Next, pick up your nori and flip it over. Add your ingredients – you can see that I have layered mine in a row, making sure there are no gaps. No one wants a piece of sushi with only half of the ingredients.
Rolling
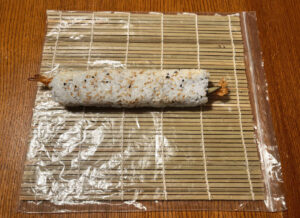
It’s now time to start rolling. Uramaki are the most forgiving sushi rolls and much easier than hosomakis or futomakis. Slowly roll everything, applying gentle pressure with your finger tips to the bottom of the roll. Keep rolling until the whole thing is closed. No need to worry about sealing the roll shut as the rice on the outside does that for you.
Use a really clean knife to slice it up. I would recommend washing it after every slice to make sure you get nice clean cuts.
And voila! Gobble gobble!
Sushi rice
Materials
Rice seasoning
- 4 tbsp Rice vinegar
- 2 tbsp Sugar
- 1 tsp Salt
Rice
- 2 cups Japanese short grain rice
- 2 cups Water (purified if possible)
- 2 tbsp Sake
- 1 piece Kombu (approximately 10cm x 15cm)
Instructions
Rice seasoning
- Mix all the ingredients together until the sugar and salt are dissolved. Mix it periodically as you wash, cook and steam the rice.
Wash the rice
- Add your rice to a medium saucepan or rice cooker insert and cover it with cold tap water. Swirl the rice around with your hand to release starches. The water will become milky white. Tip the water off, using your hand or a strainer, add more water and repeat the process 4-8 times until the water is pretty clear.
- Add 2 cups of water, preferably filtered, and 2 tbsp of sake (optional). Add a piece of kombu (also optional) and let the rice soak for 30 minutes. You will notice that the rice looks whiter at the end of the 30 minutes.
Cook the rice
Stove top:
- Take out the kombu and put the saucepan on the stove on medium high. Once the water comes to a boil, put the lid on, lower the heat to low and cook for 15 minutes. Do not open or stir the rice during this step.After 15 minutes, take the saucepan off the heat and let it sit with the lid still on for 20 minutes.
- Using a rice paddle or wooden spoon, gently mix your rice. Put the lid back on and let the rice steam for an additional 5 minutes.
Rice cooker
- Take out the kombu and put the insert into your rice cooker. Turn it on and let the rice cook.
- Using a rice paddle or wooden spoon, gently mix your rice. Close your rice cooker and let the rice steam for an additional 5 minutes.
Mix seasoning with rice
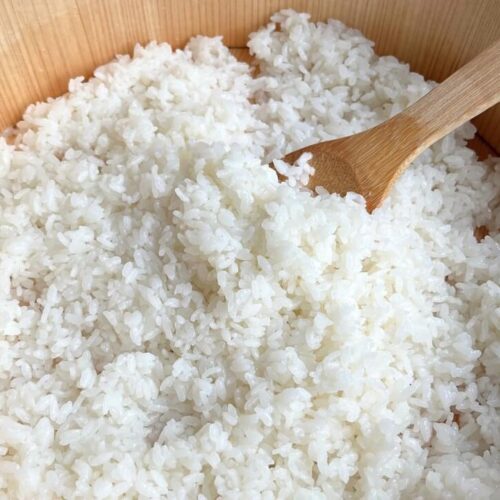
- Tip the rice into your hangiri, a large flat bottomed bowl or roasting pan and spread it out. Pour over the rice seasoning and gently stir it through the rice using a slicing gesture. Your aim is to cool down the rice as quickly as possible without breaking up or mashing the grains.
- Stand in front a fan, AC unit or use a hand fan as you stir the rice. This will help it cool down as quickly as possible. Keep mixing until the seasoning is mixed through and the rice looks shiny.
- Wait until the rice is cooled to room temperature before using it. You can cover the hangiri / bowl with a damp towel so it doesn't dry out.

Uramaki
Equipment
- Rolling mat Wrapped in plastic wrap in inside a ziplock bag
Materials
- 1 sheet Nori
- 1/2 cup Sushi rice
Uramaki filling
- Sesame seeds
- Avocado slices
- Tempura shrimp
- Kewpie mayonnaise
- Cucumber strips
Instructions
- Fold your nori in half and crease it - this will help you tear the nori into 2 pieces. Lay your nori on the sushi mat, shiny side facing down.
- Take approximately 1/2 cup of rice and with wet fingers (keep a bowl of water nearby for all sushi rolling), gently spread the rice over the nori. You don't need to leave a gap empty. Fill the whole sheet with rice.
- Sprinkle some sesame seeds on the rice (optional but adds flavour and looks pretty!)
- Pick up your nori and flip it over, so the rice is now touching the rolling mat and the seaweed side is facing up.
- Add your ingredients. Line the ingredients in a neat row so there are no gaps. This will make sure every bite has every ingredient.
- Slowly roll up the nori, applying gentle pressure with your finger tips to the bottom of the roll. Keep rolling until the whole thing is closed.
- Use a really clean knife to slice it up. I would recommend washing your knife after every slice to make sure you get clean cuts.
Different types of sushi rolls:
The main types of sushi rolls are:
Hosomaki: – thin rolls (1″ in diameter), nori on the outside, 1 ingredient inside (recipe here)
Chumaki: medium rolls (1-1.5″ in diameter), nori on the outside, 2-3 ingredients inside
Futomaki: thick rolls (2-2.5″ in diameter), nori on the outside, 4-5 ingredients inside (recipe here)
Uramaki: inside-out rolls, nori on the inside with rice on the outside
Temaki: cone-shaped hand rolls (recipe here)
